by Michelle Dwyer | May 11, 2014 | Blog, Health, Nutrition, Recipes, Vegetarian/vegan
Total Time: 20 min
Serving size: 1/2 cup
Makes approximately 7 servings
Note: Use raw, organic ingredients whenever possible.
These measurements are flexible; don’t worry too much about being exact.
Ingredients:
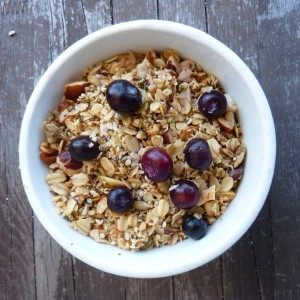
- 1 1/2 cups raw, whole rolled oats (aka old fashion oats)
- ½ cup hemp seeds
- ½ cup raw nuts, chopped (like pecans, almonds, walnuts, Brazil nuts, etc.)
- ½ cup raw seeds (sunflower, pumpkin, chia, etc.)
- ½ cup dried coconut flakes
- 1-2 tablespoons grade-B maple syrup or raw honey or a combo of both (optional)
- 2 tbsp virgin coconut oil
- ½ tsp vanilla extract
- 1 tsp cinnamon
- ½ tsp nutmeg (optional)
- 1 large pinch sea salt
Directions:
Preheat the oven to 300º F.
- Add coconut oil, vanilla, cinnamon, nutmeg, salt and optional maple syrup and/or honey to large bowl and mix together until ingredients are mixed together and oil is liquid. You can also warm the coconut oil and optional honey first so that they are both liquid before adding.
- Add oats, nuts, seeds and coconut to bowl.
- Use your clean hands to mix well and toss to coat; it will be sticky and messy but that’s the fun part.
- Spread the mixture in a thin layer on a baking sheet(s) and bake for 9-10 minutes, until very lightly toasted. Do not over-bake. I line the cookie sheets with parchment paper for easier clean up.
- Cool before serving or storing.
- This granola can be kept in an airtight container in a cool, dry place for up to 2 weeks.
Note: This is the lower sugar version; if you choose to make it without any maple syrup or honey, there will be a discernible difference. You can add fresh fruit to your morning cereal and “sweeten” it naturally instead!
Tips: Add 1/2 granola to unsweetened yogurt and 1/2 cup berries for a great breakfast or snack. Also delicious with unsweetened almond milk!
Recipe adapted from http://www.elizabethrider.com/easy-healthy-homemade-granola-recipe
by Michelle Dwyer | Jul 18, 2013 | Blog, Health, Nutrition, Recipes, Vegetarian/vegan
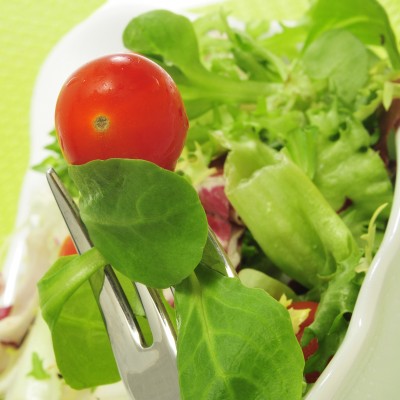
Summertime is a great season to be enjoying all the fresh fruits and vegetables at the markets. Because it is usually hot, summer is also a great time to eat foods like fresh vegetables and fruits that are both cooling and hydrating. Salads can be great way to eat these, but how do you eat and prepare salads if you are on the go?
Well, I have to share one of favorite lunch ideas, and really, this is one I just can’t stop sharing! Have you heard of salad-in-a-jar? The basic concept is to make your salads ahead of time to save time in the week, but the idea is to use a mason jar to keep the contents separate until you are ready to mix them together. The dressing goes on the bottom and the greens on very top to keep them from getting wilted and wet. Brilliant!
You can really be creative with this idea, but my favorite recipes to get started are found on this great recipe blog called The Yummy Life by Monica Matheny. I love that she starts with cooked quinoa at the base, so you get some great protein and fiber in your salad and the salad dressing gets soaked up there. The recipes are also all gluten-free and vegan. Lastly, not only are the recipes yummy and varied, but she also has some excellent preparation tips.
Take this concept and run with it! The variations and possibilities are endless. You could use brown rice instead of quinoa or no grain at all. What some meat in there?—Then add some grilled organic chicken or smoked wild salmon. I also like to vary the nuts I add to my salads, so one day it will be walnuts and another pistachios. The vegetable choices are endless—green beans, celery, carrots, shredded beets—you name it! You could even add some seasonally fruit like berries or peaches for some added flavor. Lastly, I love that you can make these ahead of time and be ready to grab and go the rest of the week!
Give it a try and let me know what you think!
And for other salad-in-jar inspirations, check out the following:
http://backtoherroots.com/2013/04/09/salad-in-a-jar-101/
http://www.salad-in-a-jar.com/how-to-make-salad-in-a-jar-2
http://kblog.lunchboxbunch.com/2012/06/vegan-salad-in-jar-make-ahead-bliss.html


by Michelle Dwyer | Jul 10, 2013 | Blog, Health, Nutrition, Recipes, Vegetarian/vegan
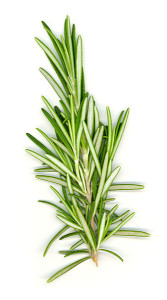
You may be seeing many fresh herbs at your farmers’ market, local store, or even in your own garden and be wondering what to do with them. Herbs are such an easy way to add not only fresh flavor and taste to your recipe, but they are also packed with nutrition.
Three things I really love about fresh herbs are . . .
- Fresh herbs are VERY nutritious, providing valuable phytonutrients, antioxidants, and anti-inflammatory compounds that both aid digestion and add great flavor!
- They are very EASY to add to any dish from homemade recipes to canned soup!
- Also, most herbs are very easy to grow, even in a small space. Then you can just pinch off or cut what you need. Indeed, this is the FRESHEST way to have your herbs!
Did you know that parsley is a great source of vitamin C? Or that rosemary and dill are great for grilled foods because of their anti-carcinogenic effects? Herbs have many healthful effects on our bodies and they taste great too!
Here are three great recipes highlighting herbs:
Orange, Radicchio and Oregano Salad
Ginger-Rosemary Lemon Drop Cocktails
And from the Post Punk Kitchen, a delicious chimichurri sauce that is great on meats, tempeh or tofu, and grilled vegetables!
Ingredients:
- 4 cloves garlic
- 1 cup loosely packed fresh cilantro
- 1 cup loosely packed fresh parsley
- 1 tablespoon of fresh oregano (or 1 t. dried)
- 1/4 cup red wine vinegar
- 2 tablespoons olive oil
- 1/2 teaspoon red pepper flakes
- 1/2 teaspoon salt
- 3/4 cup veg broth
Directions: Simply blend all of the sauce ingredients in a food processor until relatively smooth. Use as a marinade and sauce! Can also use basil, dill or mint as the fresh herbs.
Enjoy and let me know your favorite ways to fresh herbs in your cooking!
by Michelle Dwyer | Jun 5, 2013 | Blog, Health, Nutrition, Recipes, Vegetarian/vegan
I often get asked what protein powder I recommend. It’s a great question, so here are a few guidelines:
- Read the label. Looks for additives like sugar, color or filler. I prefer a protein powder that is more basic and unsweetened. You can always add your own small amount of sweetener to your smoothie, but if it is in the mix, you can’t get it out. I usually recommend sweetening with just fruit or a date.
- I usually avoid soy in my protein powder, particularly soy protein isolate. This form of soy is highly processed. Soy is also an additive in a lot of foods, so I try to limit my soy consumption to miso, tempeh and sometimes tofu.
- Whey: Whey is actually one the best sources of protein. However it is a dairy product, so if you have any dairy sensitivity, then it should be avoided.
- Hemp protein, pea protein or brown rice protein: I like the hemp because it is the least processed–usually just ground hemp seeds. The taste is fairly neutral, maybe a little nutty, and it can be a little gritty. Brown rice and pea protein are often good choices as well. When possible, look for organic.
- Additions of green juice powders, probiotics or enzymes can be great if you want that in your powder as well. Sometimes I do. Just be sure to read the label carefully to look for hidden ingredients you may not want to be eating.
- Lastly, you have to experiment to see what you like. I’ve tried dozens of protein powders—some I liked, some I didn’t. It’s probably also not a bad idea to switch up protein powders from time to time. Our bodies like variety!!
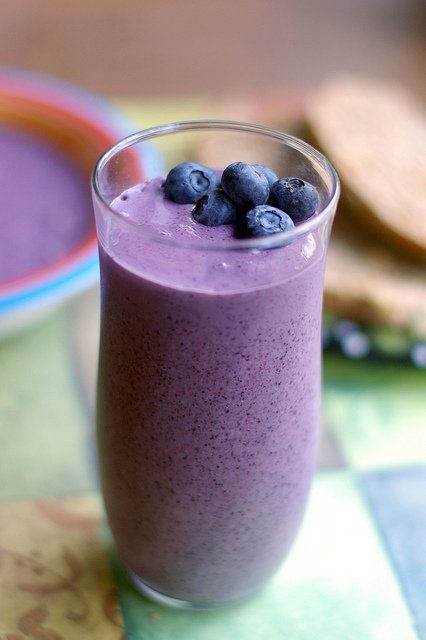
Here’s a basic smoothie recipe to get you started:
1/2 cup unsweetened almond milk
1/2 coconut water
1/2 cup frozen blueberries
1 serving of protein powder
1-2 T. of chia or flaxseeds
Enjoy!


by Michelle Dwyer | Mar 11, 2013 | Blog, Recipes
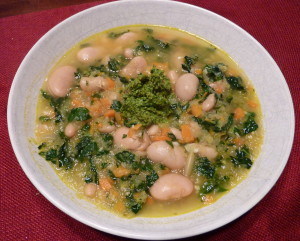
By Rebecca Katz. Recipe from One Bite at a Time.
Ingredients:
1-2 cans of cannellini or great Northern white beans
2 tablespoons extra virgin olive oil
1 3/4 cups finely chopped yellow onion
1 /4 teaspoon sea salt
1 ½ cups peeled and diced carrots
1 ½ cups peeled and diced celery
1 tablespoon diced shallot
2-4 tablespoons finely chopped garlic
1/4 teaspoon fresh thyme, or 1/8 teaspoon dried thyme
1/8 teaspoon fresh sage, or a pinch of dried sage
1/8 teaspoon fresh oregano, or a pinch of dried oregano
8 cups broth
2 tablespoons fresh lemon juice
1 bunch of dino kale or Swiss chard, stemmed and chopped into small bite‐size pieces
Cooking directions:
- In an 8-quart pot, heat the olive oil over medium-high heat. Add the onions and a pinch of salt. Sauté until golden.
- Add the carrots, celery, shallot, and 1/4 teaspoon salt. Sauté for 3 minutes more.
- Add the garlic, thyme, sage and oregano and sauté 2 minutes more.
- Deglaze the pot with 1/4 cup of the broth. Allow the liquid to evaporate.
- Add 6 cups more broth, and the beans, and simmer for 20 minutes. Add more broth if necessary to achieve the desired consistency.
- Add the greens and a pinch of salt and simmer until the greens have wilted.
- Taste! You may need to add a squeeze of lemon juice or a final pinch of salt. Serve in soup bowls with a dollop of pesto and a sprinkle of Parmesan cheese.
Serves 6
For a seasonal twist, add diced delicate or butternut squash to the carrot, celery, and onion mixture.